
Introduction to the Robot Lawn Mower Experience
The idea of passing off the duty of cutting the grass is very appealing to some. While I do like working outside, I’d rather be fussing over a garden than chained to the monotony of mowing. The idea of a robot lawn mower taking over that chore makes sense to me, but it raises some questions. Primarily, is it easy to set up, and can it follow through? This is important. I had a bad experience with a robot vacuum cleaner that never navigated my rooms correctly and was impossible to remedy. To be fair, it was a cheaper model from a lesser-known brand, but the idea of a robot mower randomly traversing the lawn, mowing spots it had already covered, missing sections entirely, or getting stuck in the same spot was a real fear. Thankfully, good robot mowers use more advanced navigation technology, so when I got my hands on one, I was excited to see how quickly and easily I could get it up and running.
Choosing the Right Robot Lawn Mower
My robot mower of choice was the Husqvarna Automower 410 iQ, which is the brand’s entry-level model. It’s designed for properties of around a half-acre in size, which was perfect for me. The property I was mowing is just about that size and has plenty of obstacles that could throw a wrench in the works. To navigate, the 410 uses an Exact Positioning Operating System (EPOS), which combines GPS and a cellular network to keep the mower on the right path. Meanwhile, a combination of Bluetooth and WiFi allows you to manually operate the mower, make changes to mapping, and activate or adjust the mower remotely if you’re away from home.

$2637.98
Shop Now
Because this particular model uses satellite positioning and a mobile network, the base station of the mower not only needs a clear view of the sky but also needs to be geographically located within the EPOS cloud network. If you aren’t in that network, Husqvarna does supply a satellite repeater that you can install to overcome that problem. Luckily, I was within that network, and there was an open view of the sky next to the house and near an outdoor outlet.
Setting Up the Robot Lawn Mower
Out of the box, the mower is mostly ready to go. All I had to do was place the charging station, secure it to the bare ground with some long plastic screws, and place the mower into its little home. From there, I powered it on, and the station did the rest, connecting the mower to the EPOS network. While I waited, I paired the 410 with the Husqvarna mobile app, connected it to the WiFi network, and checked for any firmware updates. WiFi is optional, but it’s definitely worth it, especially for remote monitoring.
The whole setup process took just a few minutes, and when the mower leaves the station for the first time (before you start mapping), it will drive out a few feet from the charger and set a “home” position. Every time it has to return, it will drive to this point and line itself up to the charger so it docks properly. It’s an orderly little robot.
Mapping Your Yard
The real test was mapping out the yard. To do this, Husqvarna divides things into three different categories: work areas, stay-away zones, and transport paths, all of which you can name. The first are the boundaries of the different areas of your property (e.g., front yard and backyard), the second are the places you want the mower to avoid (e.g., garden beds), and the third is the path the mower will take to get to different work areas, disengaging the blades en route.
Setting up the work area was the first and most important task. To do this, I used the app to remotely control the mower (fun fact: you could also pair an Xbox or PlayStation Bluetooth controller) and drove it around the boundary of the backyard, pressing a waypoint button each time I changed direction, whether slightly or sharply. Waypoints only need to be set every few feet along curves, and straight lines can be set only at each end, but I sometimes would drop one just to be safe and as precise as possible.
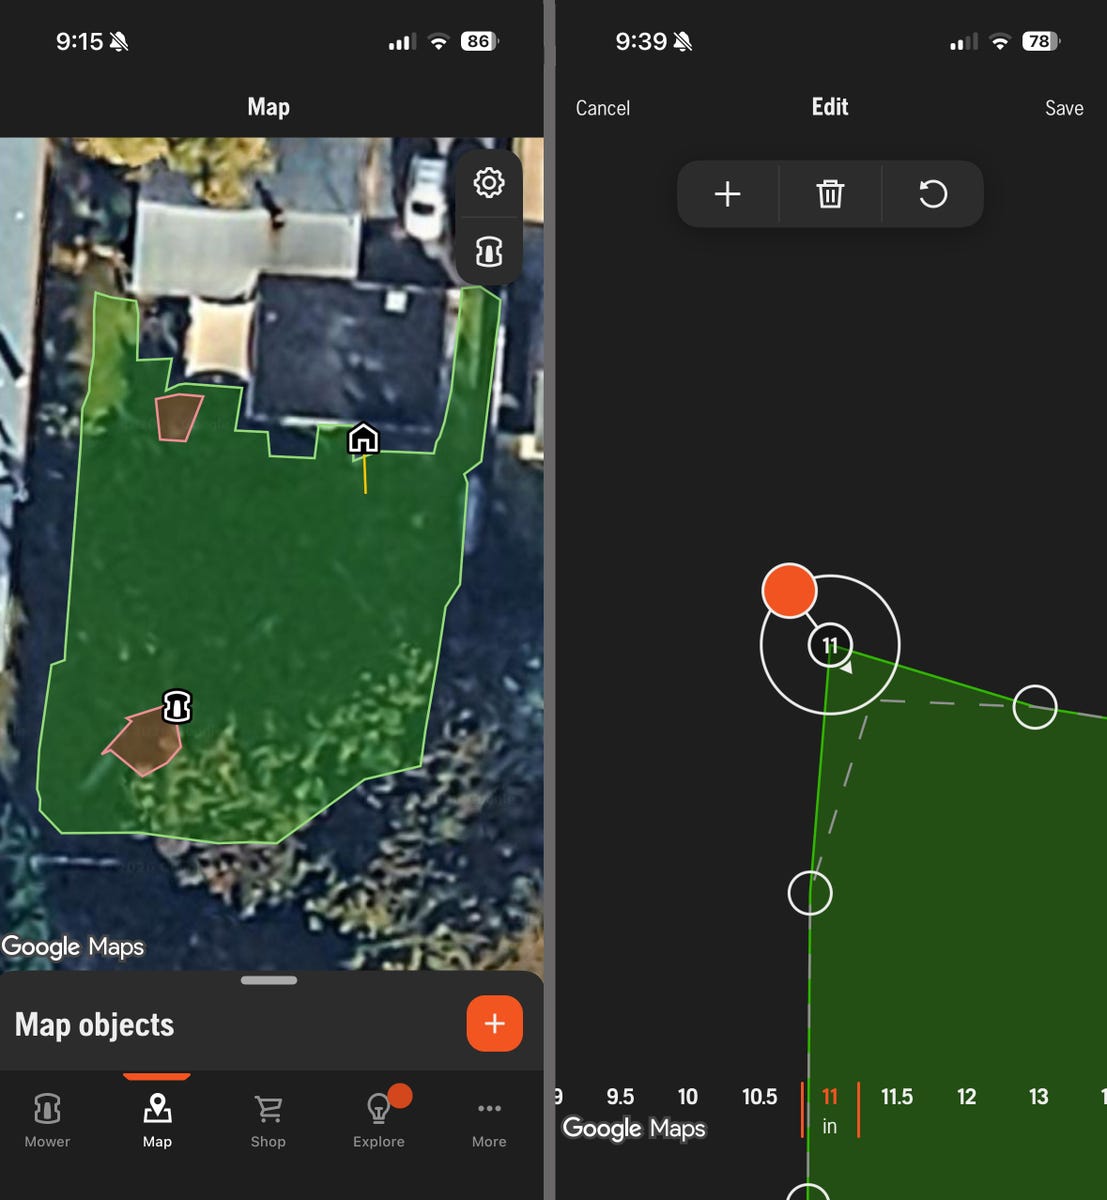
Interestingly, this system does not like 90-degree angles. Even though the mower can turn itself 360 degrees, it’s clearly stated that you should traverse diagonally when entering a perfect corner. This is likely to avoid it getting stuck in a fenced-in area, but then you neglect that area, leaving it to probably be trimmed with a weed whacker later.
Once I completed the circuit of my boundary, I hit “done,” which connects the first and last waypoint, and voilà, the virtual boundary line is set. The mower will never go outside of it unless instructed to do so. I named it “backyard,” but you could name it anything. I was tempted to call it Mordor, but that seemed dramatic.
My next step was to set up some stay-away zones. For me, this included a rectangular garden bed and a large wooden toy ship playset that my nephews used to enjoy, and now is just a piece of lawn sculpture that the cat likes to climb around. The process is the same as setting the border; using the remote control, I drove the mower around each zone, dropping waypoints to trace out the shape. I marked each one “done” when I connected back to the first waypoint of the shape. Both appeared as red zones on the map (maybe those were better areas to name Mordor).
This whole process of creating a boundary and two stay-away zones took just 20 minutes, and I found it pretty easy, and honestly, it was kind of fun. It was helpful that there are links to short explanatory videos, but I don’t think you need to be very tech-savvy to set up a map. I was impressed with the simplicity of it all.
Connecting Your Property
Like a lot of homes, the front yard and the backyard don’t easily connect. I was a bit luckier; while there’s a driveway to traverse, there’s unobstructed access after that to the front yard. This is where I had to create a working path, which is a line the mower follows to get to another work area without running the blades. Like the boundaries and stay-away zones, I remotely drove the mower along the path I wanted it to take, dropping waypoints along the way until I reached the front yard.
From there, I set up my map for the front yard quickly, as it was smaller, didn’t need stay-away zones, and I had gotten a lot more in tune with the process. Did the neighbors wonder what the heck I was doing following this mower around? Yes. But later, I’m sure they’ll have more questions when the 410 is doing it all on its own.
Mistakes Will Be Made
The first go at making a boundary map was pretty flawless, but I made a few mistakes, like creating a 90-degree angle I shouldn’t have, or dropping a waypoint a bit off track from where I wanted it. The cool thing about this Husqvarna system is that I could make adjustments in hindsight without having to drive the mower around again. All I had to do was adjust them within the app, using my fingers to move them in any direction I wanted, in half-inch increments. I definitely fixed one corner pretty drastically and smoothed out a few areas, too. Again, it was pretty easy to make the adjustments—visual learners will love it.
Did It Work as Advertised?
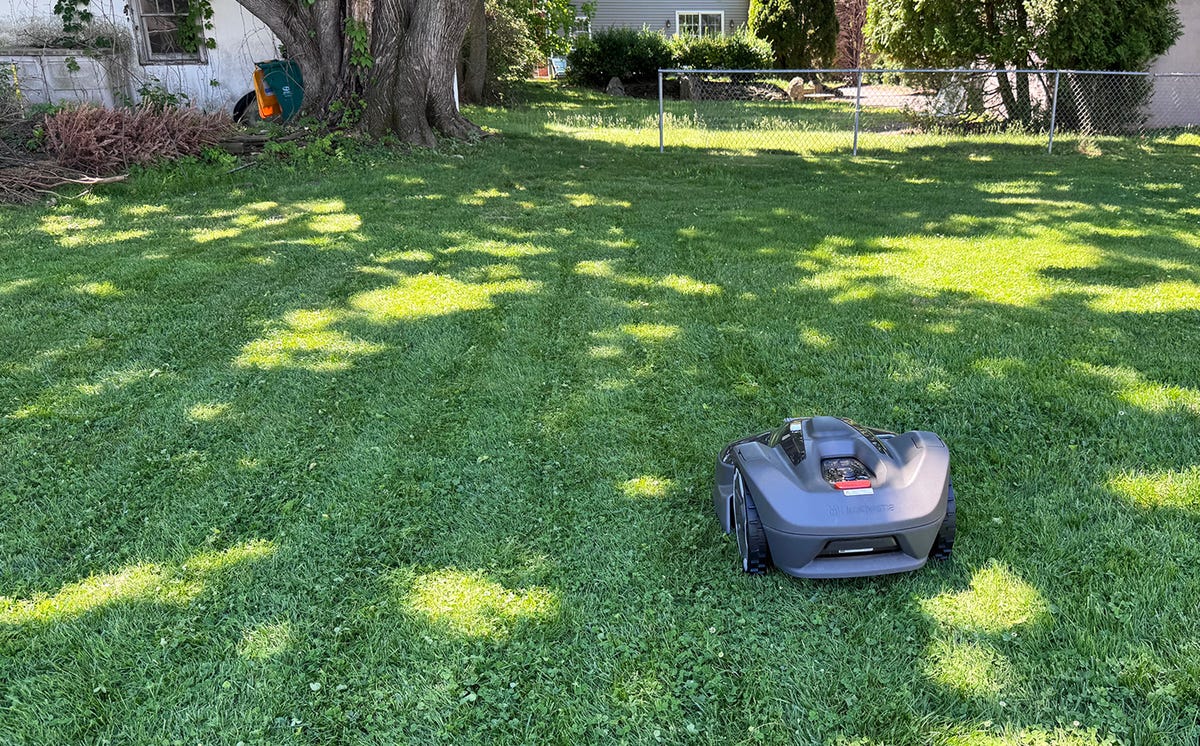
Sure, the mapping was easy, but does it work? It’s one thing to create a guide for the mower; it’s another for it to follow it properly. The 410 didn’t miss a trick. It started its first mowing session by first tracing the boundary of the backyard and then going around the stay-away zones. At one point, I got a bit worried because it seemed to make a random diagonal line that reminded me of my nonsensical robot vacuum, but then it stopped, repositioned itself, and methodically ran up and down the backyard, from one end to the other.
It had to stop at one point to recharge itself, but once that was done, it picked up exactly where it had left off. In the app, you can set it to continue to the next work area after one has been completed, which I did. It followed the work path to the front yard, cut that, and then returned to home base. By the time it was done, everything had been mowed, and I didn’t have to do a thing.
Some Things to Know About Robot Lawn Mowers
-
They don’t use regular blades and need to cut more frequently.
Robot lawn mowers generally use a spinning disc with razor-like blades attached. While they sometimes can handle longer grass, they’re really meant to maintain a lawn by cutting just a bit off the top, which means ideally you should run them twice a week (maybe three if your grass grows quickly). That’s actually not a bad thing. More frequent cuts are better for maintaining a healthy, good-looking lawn. The blades need to be changed every 200 hours of use or so, but they aren’t expensive, luckily. -
They take a long time to cut the lawn.
It takes me about 30 minutes to cut the backyard. It took the robot nearly two and a half hours of runtime, plus an added hour for a recharge, mid-mow. This is partly because they only have a cutting width of about 9 inches, and they move a lot slower than you do. But if you set it to run while you’re at work, or late at night, who cares how long it takes? That’s the whole point of automation. -
They are incredibly quiet.
Because they run on battery power and only use small razor blades to make the cuts, most robotic mowers make even less noise than an electric lawn mower. While I ran the 410 iQ, all I heard was an almost imperceptible hum and the tiny snips of grass tips, as if someone were using scissors—even the cat was unfazed. -
You can schedule them.
A good robot mower will allow you to create schedules. In the case of the 410 iQ, there’s a calendar app that lets me schedule dates and times, change them as needed, and override them if I notice it needs an extra trim. This means you could set up a schedule for the whole summer and theoretically never have to touch the mower again, except to change the blades when the time comes. It’s like hiring a service to do it, but for a lot less money in the long run.


No comments:
Post a Comment